Using Python to Calculate Sentiment in Power BI
- Mark Cunningham

- May 22, 2021
- 4 min read

I recently created a Power(ed) Up version of my Resume using Power BI. As part of the build I extracted the recommendations I had received from Power BI and used the built-in 'AI Insights' to score the sentiment of each. This is a simple 'no code' way to get Sentiment Polarization scores on text. However, there is a set back... you need to have a Power BI Pro or Premium to get access to this.
An alternative 'free' method is to use Python in Power BI to achieve the same. But be warned... this can be a fairly involved process. Particularly if you use Anaconda to manage your Python install and environments.
The purpose of the following is to step through the set up process I had to follow to be able to make use of Python in Power BI to perform simple sentiment analysis.
Installing Python
System Setup
Windows 10 installed on MacBook Pro using Bootcamp
Python 3.7 installed via Anaconda
Power BI (Stand alone install - not the Windows 10 app version) - important
The Microsoft documentation on configuring Python on Power BI desktop is a good place to start. However, if you use Anaconda to manage your environments then you are going to run into trouble when trying to 'use' it. This is noted in the document here

The following shows the steps I used to 'work around' the issues. This isn't my solution but rather it has been cobbled together from a number of different posts from others. I will provide those links in the references section below.

Install Anaconda distribution of Python: Click here and select the installation package based on your requirements and follow the steps of the installer.
Set Up a Anaconda environment: Once installed you will want to set up a separate environment from which Power BI will run Python from.
1. In Anaconda Navigator create a new environment and name it and select the python version you would like to install. In my case I have named it 'powerbi' and have selected Python 3.7

2. Search for and Install the packages you need. In my case I have included the following;
pandas*
matplotlib*
nltk (Natural Language Tool Kit)
Set Up Power BI to use Python: Follow the steps in the Microsoft set up documentation to Point Python environment you have set up above.

The Python Script (... it wont work)
Power BI allows for you to use both Python and R to extend the the capabilities of the tool. In this example I needed to extend an existing set of data that had already been loaded into the Power Query.
1. With your Query selected from the toolbar choose Transform > Run Python Script

2. In the Run Python Script box enter the following code
# 'dataset' holds the input data for this script

#load in our dependencies
import pandas as pd
import nltk
nltk.downloader.download('vader_lexicon')
from nltk.sentiment.vader import SentimentIntensityAnalyzer

#load in the sentiment analyzer
sia=SentimentIntensityAnalyzer()

#apply the analyzer over each comment
dataset['Python Sentiment'] =dataset["Recommendation"].apply(lambda x: sia.polarity_scores(x)['compound'])
Note: Power BI uses the variable dataset to hold the data frame. If you have scripted this in a Python IDE and you have 'named' your variable something else then you will get an error.
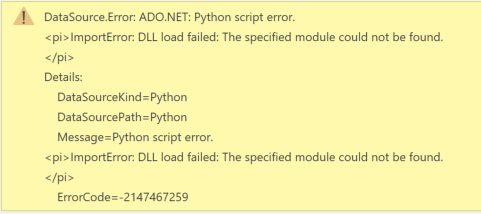
.....But it wont work!!!

This is where things got challenging. The Code is right (I tested in Google Colab - no issue). The set up for Power BI looked right so what was going on? Luckily I found the following reference on the Power BI community where someone was having the same issue and fortunately someone posted the solution.
The issue seemed to be with the later versions of Python install in Anaconda but the work around related to 2 things:
Activating Conda Environment (Python)
Launching Power BI from the same environment
Here is how to accomplish each
The Work Around(s) - make sure Power BI is closed First
Activating the Conda Environment: You can do this via Anaconda Navigator by;
1. Selecting your Python environment and launching the Command Terminal.

2. In the Command Terminal window check that the Environment is referenced and then enter conda activate. This activates the environment that you want to call the Python scripts to run against. Make sure that the Environment in your Power BI Python configuration and what is displayed in the Command Terminal window match.
3. Once the environment is activated all you need to do is to launch Power BI from the same Terminal window. The pathway will be something like "C:\Program Files\Microsoft Power BI Desktop\bin\PBIDesktop.exe"

Important Note: This is WHY it is important to use a stand alone installation of Power BI rather than the Windows 10 app that you can download from the store. If you use the Windows 10 app then Power BI is Hidden in a folder Program Files>WindowsApps. You can look to give yourself Admin Access to this folder but this may not always be possible. In my case it wasn't.
Re-Run the Python Script and watch the Magic Happen
Now that you have activated your target conda environment and relaunched Power BI from the same, all will work as expected.
Below I can see that the Python Script has been executed correctly thus I just need to expand the table to get the results. Now all you have to do is transform the data as you need before loading the query so you can build your visualizations as required.

Some Good References
Community Post with Similar Problem and reference to solution https://community.powerbi.com/t5/Desktop/Power-BI-Python-with-Anaconda-missing-dependency/td-p/665102
Blog post containing core component of Python Script https://www.absentdata.com/power-bi/sentiment-analysis-in-power-bi/
Another blog post highlighting the issues with an Anaconda distribution Python in Power BI: Enabling Python Scripts with Anaconda — Continuus Technologies (continuus-technologies.com)
Microsoft Documentation - Setting Python in Power BI Run Python Scripts in Power BI Desktop - Power BI | Microsoft Docs


Comments